In some situations, you may need to grant non-system admins access to the Exalate Admin Console without giving away system-wide admin permissions. This would allow you to delegate admin maintenance tasks, such as adding, editing, and deleting Exalate configurations, create connections for all projects in Jira on-Premise, Jira Cloud, Zendesk, Salesforce, ServiceNow, and Azure Devops. As a delegated admin you can view and manage Errors, Sync Queue, Triggers, Clean-up, and Bulk Connect.
While setting up delegated admin access varies from platform to platform (see below for specific instructions), in general the the delegated admin user must fulfil the following requirements:
- be a member of the exalate_console_admin group
- be a project admin
Note: The system tracker admin must create the exalate_console_admin group.
Note: A project admin who is also a member of the exalate_console_admin. group cannot accept Public Basic and Visual connections which have been initiated from the remote side.
Jira On-Premise
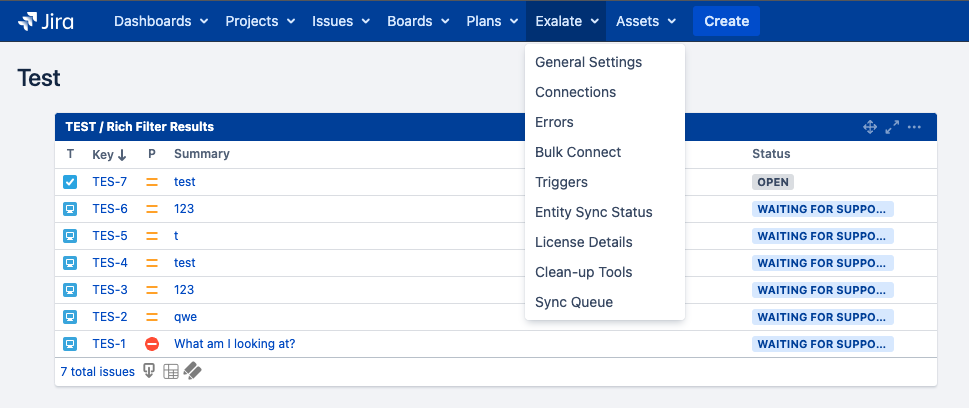
For Jira On-Premise users who are in the Exalate console admin group but are not regular admins, the Exalate menu is found on the top menu bar:
Note: For Jira On-Premise the delegated admin user does not have to be a project admin.
Jira Cloud
- Create the exalate_console_admin group
- Go to your Jira settings by clicking on the settings cog in the bottom left corner, then select System from the menu.
- Under User Management, select Groups.
- Click on Create group.
- Enter a name for your group, such as exalate_console_admin. You can also add a group description.
- Click Create to create the group
- Assign the permissions from the project settings
- Add users to the group
- Go back to the group management page (Settings > User management > Groups).
- Find the exalate_console_admin group and click on it to open its details.
- Click on Add users to group.
- Search for and select the users you want to add to the group.
- Click Add to add the selected users to the group.
Note: the above instructions only work with a paid version of the Jira instance.
Zendesk
In Zendesk, there are two ways to grant access to the Exalate admin console without granting full admin permissions:
- Create a Custom Role to grant an agent limited permissions
- Use the agent role with minimal permissions (Contributor)
Important: The Exalate app should not have any roles and groups restrictions enabled on the app settings in order to provide access to all internal Zendesk users (team members).
Salesforce
For Salesforce, it is possible to install the app for specific profiles and the system admin can configure a specific profile to access the app configuration.
ServiceNow
Create the user and user group.
To create a delegated admin user we need the following:
- A basic user that is Active, with a set password
- A user group called exalate_console_admin
- Add the a user to the above group
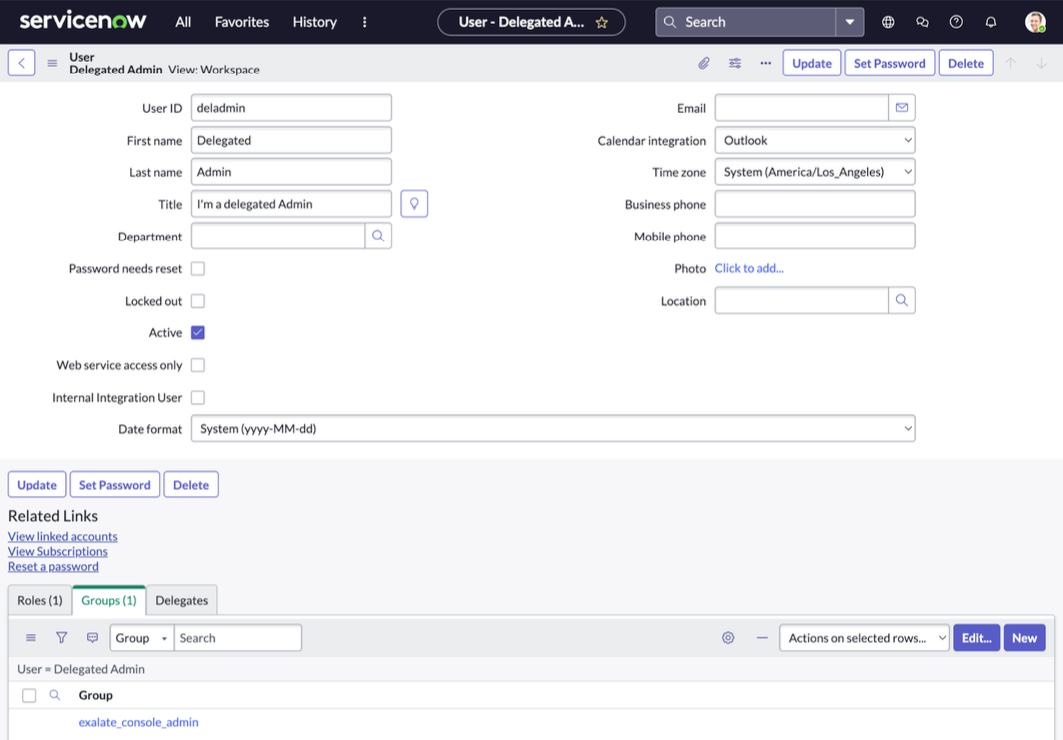
Note: You need to uncheck the “Passwords needs reset” if the user is not be logged in to the ServiceNow interface.
Azure Devops
The requirements are the same for a delegated admin:
- be a member of the exalate_console_admin group
- be a project admin